Learn how to use Zapier AI automation to eliminate repetitive tasks, connect your apps, and build no-code business workflows in minutes. A practical step-by-step guide.
Introduction
Every business runs on repetitive tasks. A new lead fills out a form — someone copies it into the CRM. A customer sends an email — someone forwards it to the right team. A team member submits a request — someone manually creates a Trello card and sends a Slack notification. Multiply these small tasks across a team of ten, twenty, or a hundred people, and you are looking at dozens of hours per week consumed by work that adds no real value.
Zapier AI automation exists to eliminate exactly this kind of friction. By connecting the apps your team already uses and automating the handoffs between them — without writing a single line of code — Zapier lets you reclaim that time and redirect it toward work that actually requires human judgment.
Combined with AI integrations (OpenAI, Claude, and others available natively inside Zapier), business workflow automation now extends beyond simple data transfer into intelligent, context-aware automation: drafting email replies, summarizing form submissions, classifying support tickets, and generating content — all triggered automatically.
This guide is written for startup founders, HR teams, marketing managers, operations leads, and corporate professionals who want a clear, practical introduction to no code automation using Zapier — with a focus on simple, high-impact workflows you can build and launch today.
By the end, you will understand how Zapier works, how to build your first automated workflow step by step, and how to extend it with AI to handle tasks that go beyond simple data movement.
Quick Summary
- Zapier connects 6,000+ apps and automates the handoffs between them without code.
- A “Zap” is a workflow with a trigger (something that starts it) and one or more actions (what happens next).
- Zapier’s native AI integrations allow you to add intelligent steps — summarization, classification, drafting — inside any workflow.
- Most useful Zaps take under 15 minutes to build and can save hours of manual work per week.
- Free plan available; paid plans start from $19.99/month and unlock multi-step Zaps and AI features.
- Best starting use cases: lead capture to Google Sheets, email routing, form response handling, and Slack notifications.
Table of Contents
- What You’ll Learn
- Why Manual Workflows Are Costing Your Business More Than You Think
- Tool Overview: Zapier for Business Workflow Automation
- Step-by-Step Tutorial: Build Your First AI-Powered Zap
- Tutorial Video
- How Businesses Use Zapier AI Automation
- Best Practices for No-Code Automation
- Common Mistakes in Zapier Setup
- FAQ
- Alternative Automation Tools
- Key Takeaways
- Conclusion
- Related Guides
What You’ll Learn
- How Zapier works and what makes it different from other automation tools
- How to build a simple, practical Zap from scratch in under 15 minutes
- How to add an AI step to your workflow for intelligent, context-aware automation
- Which workflows deliver the most time savings for teams of different types
- How to avoid the most common Zapier setup mistakes
- When to use Zapier versus other no-code automation tools
Why Manual Workflows Are Costing Your Business More Than You Think
Manual handoffs between tools and people are invisible in the day-to-day — each one takes a minute or two, so nobody tracks them. But they accumulate.
You might also like: How to Build AI-Powered Approval Systems for Corporate Teams
Related guide: How Corporate Teams Build AI Workflows for Daily Operations
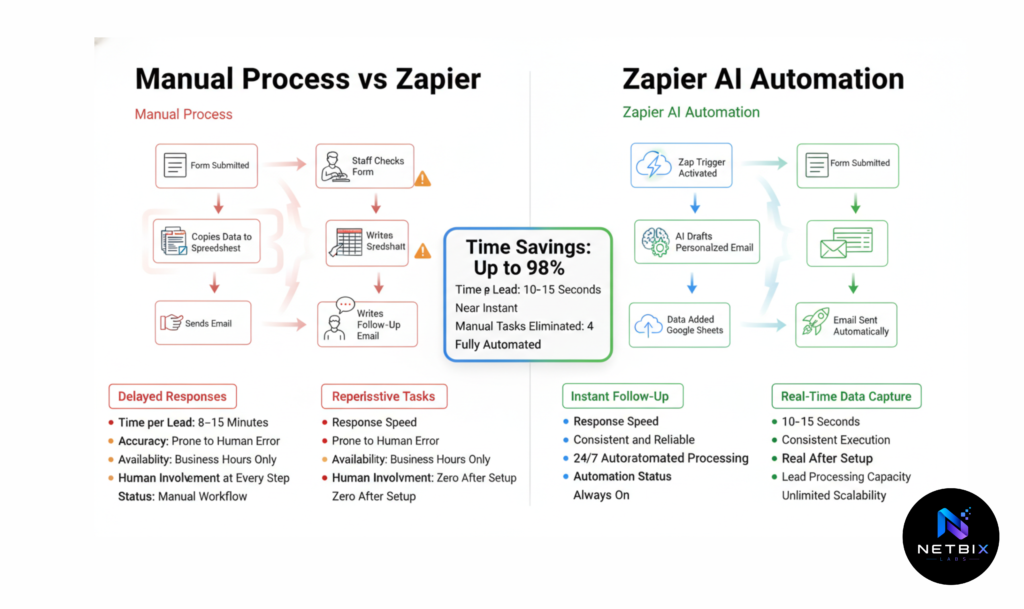
A marketing team manually moving leads from a form tool to a spreadsheet, then writing a follow-up email, then notifying the sales team — that is three separate actions for every single lead. At 50 leads per week, that is 150 manual tasks, or roughly 3–4 hours of work that could be handled by a single Zapier workflow connected to Google Sheets.
The problem is not just the time. It is the reliability. Manual handoffs get missed. Data gets entered incorrectly. Notifications get forgotten. And when something falls through the cracks, the cost is often much higher than the time saved by doing it manually in the first place.
AI workflow tools like Zapier solve this by making automation accessible to anyone — not just developers. If you can describe what you want to happen (“when a new form is submitted, add the person to my CRM and send them a welcome email”), Zapier can build it. And with AI integrations, you can add an intelligent middle step: summarize the form response, classify the inquiry type, or draft a personalized reply — automatically.
Tool Overview: Zapier for Business Workflow Automation
What It Is
Zapier is the world’s leading no-code automation platform, connecting over 6,000 apps in a single interface. It works through “Zaps” — automated workflows that run in the background, moving data between apps and triggering actions without any manual intervention.
Each Zap has two core components:
- Trigger — an event in one app that starts the workflow (e.g. “New form submission in Typeform”)
- Action — what happens next in another app (e.g. “Create a new row in Google Sheets”)
Multi-step Zaps add additional actions after the first, and Zapier AI adds intelligent processing steps powered by OpenAI or other AI models natively inside the workflow.
Key Features
- 6,000+ app integrations — connects virtually every SaaS tool your team uses
- Zapier AI (AI by Zapier) — native AI steps for text summarization, classification, drafting, and transformation inside any Zap
- Zap templates — pre-built workflow templates for common use cases (lead capture, email automation, CRM workflows, Slack notifications)
- Paths — conditional logic that routes a workflow differently based on data (e.g. route high-value leads to one pipeline, others to another)
- Filters — stop a Zap from running when specific conditions are not met
- Formatter — transform data between steps (format dates, extract text, split names)
- Tables and Interfaces — Zapier’s built-in database and form tools for workflows that need a data layer
- Zapier Canvas — visual workflow builder for mapping and planning multi-step automations
Why Businesses Use It
Zapier is the default automation tool for non-technical teams because it requires no coding, no infrastructure, and minimal setup. A marketer, HR manager, or operations coordinator can build and deploy a working automation in under 30 minutes — something that previously required a developer and a sprint cycle.
Ideal Use Cases
- Lead capture automation (form → CRM → email sequence → Slack alert)
- HR onboarding workflows (new hire form → Slack welcome → document generation)
- Customer support ticket routing (email → helpdesk → classification → assignment)
- Content and social media scheduling (Google Sheet entry → Buffer → email notification)
- Internal approval workflows (form submission → manager notification → response logging)
Official Website: https://zapier.com
Official Documentation: https://zapier.com/help
Step-by-Step Tutorial: Build Your First AI-Powered Zap
The workflow we are building is one of the most universally useful for business teams: “When a new contact form is submitted, log the data in Google Sheets and send an AI-drafted follow-up email.”
This covers three things at once — data capture, spreadsheet logging, and personalized outreach — all triggered by a single form submission, with zero manual steps. Google Sheets is used here as the data layer instead of a paid CRM, making this workflow completely free to run outside of Zapier’s own plan costs.
Step 1: Set Up Your Zapier Account and Choose Your Trigger App
Why it matters: The trigger is the event that starts everything. Choosing the right trigger app — and connecting it correctly — is the foundation of every Zap. If the trigger does not fire reliably, the entire workflow breaks down.
What to do:
- Go to https://zapier.com and sign up for a free account (the free plan supports single-step Zaps; for this multi-step workflow, a Starter plan is needed).
- From the Zapier dashboard, click “Create Zap”.
- In the trigger search bar, type your form tool — for this example, Typeform (works equally with Google Forms, Jotform, or any form tool Zapier supports).
- Select the trigger event: “New Entry” — this fires every time someone submits the form.
- Click “Sign in to Typeform” and authorize the connection.
- Select the specific form you want to use as the trigger from the dropdown.
- Click “Test trigger” — Zapier will pull the most recent form submission as sample data to use in the next steps.
Expected result: A connected trigger that fires every time a new form entry is received, with sample data populated and ready to use in subsequent steps.

Step 2: Add an AI Step to Process the Form Submission
Why it matters: This is where the workflow becomes genuinely intelligent. Instead of just moving raw form data to the next tool, you add an AI step that reads the submission and produces something useful — a personalized email draft, a summary of the inquiry, or a classification of the request type. This step takes 60 seconds to configure and adds significant value to every submission processed.
What to do:
- Click the “+” button below the trigger to add a new action step.
- Search for “AI by Zapier” (Zapier’s native AI integration) and select it.
- Choose the action: “Analyze Text” or “Generate Text” depending on what you need. For this workflow, select “Generate Text”.
- In the prompt field, write a clear instruction for the AI. For example:
“You are a professional business assistant. Based on the following contact form submission, write a short, friendly, and personalized follow-up email (3–4 sentences) that acknowledges their inquiry and lets them know someone will be in touch within 24 hours. Do not include a subject line. Name: [Name field] / Company: [Company field] / Message: [Message field]”
- Use Zapier’s field insertion to map the actual form data fields (Name, Company, Message) into the prompt dynamically — so every submission produces a unique email body.
- Click “Test step” to preview the AI-generated email using your sample form data.
Expected result: An AI-generated, personalized follow-up email body produced for each form submission — ready to be sent in the next step without any manual writing.

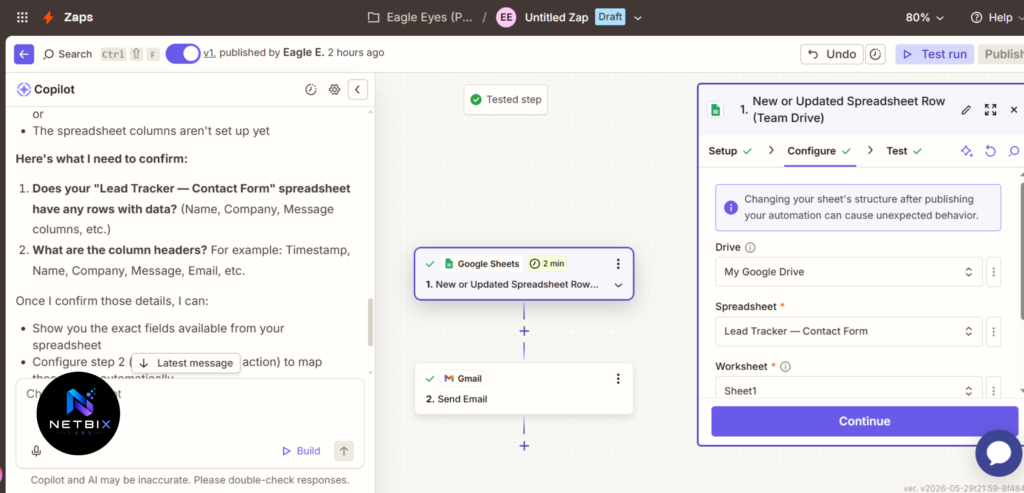
Step 3: Set up Google Sheets as a Contact Database
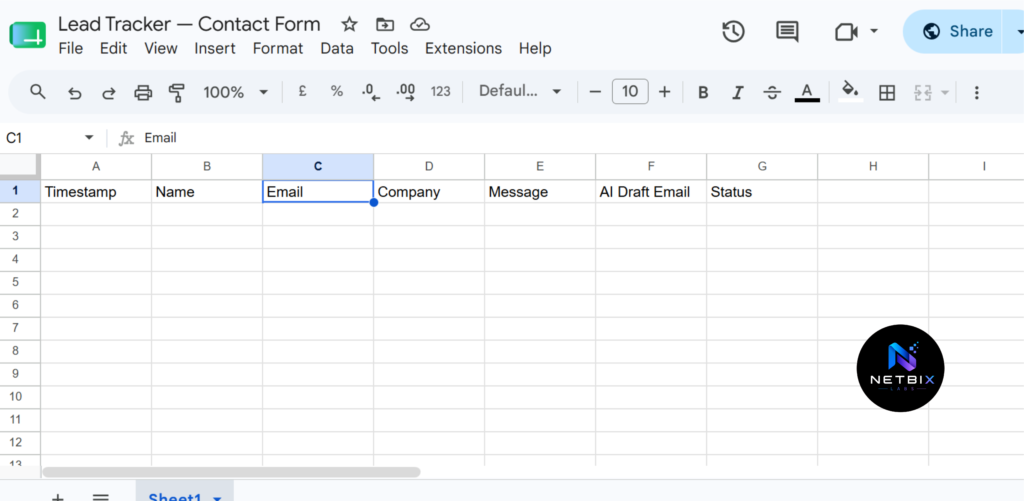
Why it matters: Before connecting Zapier to Google Sheets, the spreadsheet must be properly structured. Zapier requires the first row as column headers — if it’s missing, field mapping in Zapier won’t work correctly.
How to set up Google Sheets:
- Open Google Drive and create a new spreadsheet. Give it a clear name, for example: “Lead Tracker — Contact Form.”
- In the first row (row 1), create the following column headers—one column per cell:
| A | B | C | D | E | F | G |
|---|---|---|---|---|---|---|
| Timestamp | Name | Company | Message | AI Draft Email | Status |
- The Timestamp column will be automatically populated by Zapier with the submission time.
- The AI Draft Email column will receive the output from Step 2 (AI by Zapier).
- The Status column can be manually populated by the team after the follow-up is completed (e.g., “New,” “Contacted,” “Closed”).
- Save the spreadsheet and copy the URL—you’ll need it when configuring Zapier.
Here is the translated version with the same formatting:
How to connect to Zapier:
- Go back to the Zap editor, click “+” to add a new action step.
- Search for “Google Sheets” and select the action: “Create Spreadsheet Row” — this adds a new row for each form submission.
- Click “Sign in to Google Sheets” and allow the connection to your Google account.
- Select the “Lead Tracker — Contact Form” spreadsheet from the dropdown, then choose the appropriate sheet tab (usually “Sheet1”).
- Perform field mapping between Zapier data and spreadsheet columns:
- Timestamp → select “Use a custom value” then type
{{zap_meta_human_now}}for an automatic timestamp - Name → map to the Name field from Typeform
- Email → map to the Email field from Typeform
- Company → map to the Company field from Typeform
- Message → map to the Message field from Typeform
- AI Draft Email → map to the output from Step 2 (AI by Zapier)
- Status → type “New” as a static value
- Timestamp → select “Use a custom value” then type
- Click “Test step” and open Google Sheets to verify that the new row was successfully created.
Expected result: Each form submission automatically adds a new row in the spreadsheet with all data fully filled in — including the AI-drafted email in column F — forming a clean contact database, sorted by time, and filterable at any time.
Step 4: Send the Follow-Up Email Automatically
Why it matters: Speed-to-lead — how quickly a prospect receives a response after making contact — has a significant impact on conversion rates. An automated follow-up sent within seconds of form submission, using the AI-drafted content from Step 2, creates a professional first impression without requiring anyone to be online at the moment of submission.
What to do:
- Add a final action step by clicking “+”.
- Search for Gmail (or your email provider — Outlook, SendGrid, and Mailchimp all work).
- Select the action: “Send Email”.
- Connect your Gmail account and configure the email fields:
- To: map to the form Email field
- From: your business email address
- Subject: write a static or semi-dynamic subject line, e.g. “Thanks for reaching out, [Name]” — map the Name field for personalization
- Body: map to the AI-generated email body from Step 2
- Click “Test step” and check your inbox to confirm the email arrives correctly formatted.
- Turn the Zap On using the toggle in the top-right corner.
Expected result: Every new form submission now automatically: generates a personalized AI email draft, logs the contact data and email draft to Google Sheets, and sends the follow-up email to the prospect — all within seconds of submission, with zero manual involvement. Your spreadsheet becomes a live, always-updated contact database requiring no manual data entry.
Tutorial Video: How to Create Automated Workflows with Zapier and AI
Before you start building your first Zap, we highly recommend watching this short video tutorial that visually demonstrates how the platform works — from connecting two apps, adding AI steps, to activating the Zap and monitoring the results in real-time.
How Businesses Use Zapier AI Automation
Startups
Early-stage teams use Zapier to build operational processes they do not yet have the headcount to run manually. A three-person startup can automate lead capture, customer onboarding emails, invoice generation, and Slack team notifications — running operations that would otherwise require a dedicated coordinator.
Agencies
Digital agencies use Zapier to automate client onboarding, project kickoff notifications, and reporting workflows. When a new client signs a contract in their CRM, Zapier can automatically create the project in Asana, send a welcome email, and notify the account manager in Slack — eliminating the manual setup checklist that previously consumed 30–45 minutes per new client.
Marketing Teams
Marketing teams use email automation and Google Sheets-based tracking through Zapier to ensure every lead is captured and followed up immediately. New leads from ads, organic forms, and events are logged automatically into a structured spreadsheet with AI-drafted follow-up emails ready for the team — without a marketing coordinator manually copying data from form to spreadsheet to inbox.
HR Teams
HR departments use Zapier to automate repetitive onboarding tasks. When a new employee is added to the HRIS, Zapier can trigger: a welcome Slack message, an IT equipment request form, a calendar invite for orientation, and a checklist in the project management tool — all from a single trigger event.
Operations Teams
Operations teams use Zapier to connect their approval workflows, project management tools, and communication platforms. A purchase request submitted in a Google Form can automatically create a task in Monday.com, notify the approver in Slack, and log the request in a Google Sheet — creating a traceable, automated approval process without building custom software.
Creators and Solopreneurs
Individual creators use Zapier to automate the business side of content production — routing newsletter subscribers to their email platform, saving social media mentions to a spreadsheet, automatically posting new blog content to social channels, and collecting testimonials into a Google Doc. Automation frees creator time for the actual creative work.
Enterprise Workflows
Larger organizations use Zapier alongside their enterprise tools to bridge the gaps between systems that do not natively integrate. A Salesforce opportunity moving to “Closed Won” can trigger a contract generation in DocuSign, a project creation in Jira, and a revenue notification in the finance team’s Slack channel — creating cross-system automation without a custom integration project.
Best Practices for No-Code Automation
Start with one workflow, not ten. The fastest way to understand what Zapier can do for your business is to pick your single most repetitive, most annoying manual task and automate it completely. One well-built Zap teaches you more than ten half-built ones.
Always test before turning a Zap on. Zapier’s testing tools exist for a reason. Test every step with real data before activating a Zap — especially if it sends emails, creates records, or modifies data in your CRM. A Zap sending 500 duplicate emails because it was not tested properly is a real and recoverable but deeply unpleasant experience.
Use filters to prevent Zaps from running on every trigger. Not every form submission or CRM update should trigger the full workflow. Use Zapier’s Filter step to add conditions — only run this Zap if the lead source is “website form” or the deal value is above $5,000.
Write clear AI prompts with specific output instructions. Vague prompts produce vague AI outputs. Tell the AI exactly what format you want, how long the output should be, and what tone to use. Test the prompt with multiple different input samples before deploying the Zap.
Name your Zaps descriptively. “Zap 1” tells you nothing in six months when you are troubleshooting. Use names like “Typeform Lead → Google Sheets + AI Follow-Up Email” — clear enough that anyone on the team understands what it does without opening it.
Monitor your Zap history weekly. Zapier logs every run — successes and errors. Review your Zap history weekly, especially for new Zaps in their first month. Errors caught early are easy to fix; errors running unnoticed for weeks create data problems that take significant time to clean up.
Common Mistakes in Zapier Setup
Building complex multi-step Zaps before mastering simple ones. Teams that try to build a ten-step workflow as their first Zap get lost in the complexity and give up. Build two-step Zaps first. Add steps one at a time once the foundation works.
Not mapping fields correctly between steps. The most common cause of broken Zaps is incorrect field mapping — using a field from Step 1 where a field from Step 3 was needed, or mapping a field that is sometimes empty and causes the action to fail. Always verify field mapping by testing with real data.
Using overly broad triggers that fire too often. A trigger set to “Any new row in Google Sheets” will fire for every row added to that sheet — including rows added by other automations, imports, or team members’ unrelated updates. Use specific triggers and add filters to narrow down when the Zap should actually run.
Forgetting that free plan Zaps run with a 15-minute delay. On Zapier’s free plan, Zaps check for new triggers every 15 minutes rather than in real time. For time-sensitive workflows — lead follow-up, support ticket routing — this delay matters. Paid plans run every 1–2 minutes, and some premium plans support near-instant triggers.
Writing AI prompts without testing edge cases. An AI prompt that works perfectly for a standard inquiry may produce unexpected output for an unusual or very short submission. Test your AI steps with edge case inputs — a one-word form response, a submission in a different language, or a very long message — before activating the Zap.
Not setting up error notifications. Zapier can send email alerts when a Zap encounters an error. This feature is disabled by default for most users. Enable error notifications for any Zap that handles customer-facing communication or CRM data — so issues are caught immediately rather than during a quarterly audit.
FAQ
What is Zapier and how does it work? Zapier is a no-code automation platform that connects over 6,000 apps and automates the tasks that happen between them. It works through “Zaps” — workflows with a trigger (an event that starts the automation) and one or more actions (what happens as a result). When the trigger fires, Zapier executes the actions automatically, transferring data between apps without any manual intervention. No coding or technical skills are required to build and deploy Zaps.
What can you automate with Zapier AI? Zapier AI (AI by Zapier) allows you to add intelligent processing steps inside any workflow — including text summarization, content generation, email drafting, sentiment classification, and data extraction from unstructured text. Combined with Zapier’s 6,000+ app integrations, this means you can build workflows that not only move data between tools but also intelligently process it along the way — for example, generating a personalized email from a form submission or summarizing a customer support ticket before routing it.
Is Zapier suitable for beginners with no coding experience? Yes — Zapier is designed specifically for non-technical users. Its interface is entirely visual, with dropdown menus, field mapping, and test buttons at every step. Most simple Zaps can be built in under 15 minutes using pre-built templates. The learning curve is primarily about understanding trigger-action logic, which most users pick up within their first two to three Zaps.
How much does Zapier cost for a small business? Zapier’s free plan supports five single-step Zaps running every 15 minutes — sufficient for testing but limited for business use. The Starter plan ($19.99/month billed annually) supports 20 multi-step Zaps with faster update times. Professional and Team plans ($49–$69/month) unlock unlimited Zaps, paths, and premium app connections. Most small businesses start on the Starter plan and upgrade as their automation needs grow.
What is the difference between Zapier and Make (formerly Integromat)? Both are no-code automation platforms, but they have different strengths. Zapier is simpler, faster to set up, and has a larger app library — making it the better choice for straightforward workflows and non-technical users. Make offers more visual, complex workflow building with greater control over data transformation and error handling — better suited for developers or users with more complex multi-branch automation requirements. For most business teams starting with automation, Zapier is the more accessible entry point.
Can Zapier replace a developer for business automation? For the majority of business workflow automation needs — connecting SaaS tools, routing data, triggering notifications, automating email — Zapier can fully replace developer involvement. For deeply custom integrations, complex business logic with many conditional branches, or automation that requires access to internal databases or private APIs, a developer may still be needed. Zapier is best positioned as a tool that handles 80% of business automation needs without code, freeing developer capacity for the 20% that genuinely requires it.
Alternative Automation Tools
Make (formerly Integromat)
What it does: Make is a visual workflow automation platform with a more advanced, flowchart-style builder than Zapier. It supports complex branching logic, iterators, aggregators, and fine-grained error handling — giving technical users greater control over how data is processed between steps.
When it’s better: When your workflow involves complex conditional logic, data transformation at multiple points, or you need detailed control over exactly how each step handles errors and edge cases. Make’s pricing is also more generous on task volume for technical users building high-frequency automations.
Who should use it: Operations teams with technical capability, developers building business automation, and organizations running high-volume workflows where Zapier’s task pricing becomes costly.
Website: https://www.make.com
n8n
What it does: n8n is an open-source workflow automation platform that can be self-hosted for complete data privacy and control. It provides a visual node-based workflow builder with native AI integrations, HTTP request nodes for custom API connections, and a code node for custom JavaScript execution.
When it’s better: When your organization has strict data residency or privacy requirements that prevent using cloud-based automation platforms, or when you need deep custom integrations that Zapier’s pre-built connectors do not support.
Who should use it: Technical teams, organizations in regulated industries, and businesses that want full control over their automation infrastructure without ongoing per-task costs.
Website: https://n8n.io
Microsoft Power Automate
What it does: Microsoft Power Automate is Microsoft’s enterprise automation platform, tightly integrated with Microsoft 365, Teams, SharePoint, Dynamics 365, and the broader Azure ecosystem. It supports desktop automation (RPA), cloud flows, and AI Builder for document processing and form recognition.
When it’s better: When your organization is standardized on Microsoft 365 and you want automation that works natively within Teams, Outlook, SharePoint, and Dynamics without requiring external tool connections.
Who should use it: Enterprise teams and corporate organizations already invested in Microsoft 365, particularly those needing automation across both cloud services and desktop applications.
Website: https://powerautomate.microsoft.com
Activepieces
What it does: Activepieces is an open-source, self-hostable automation platform designed as a developer-friendly alternative to Zapier. It provides a growing library of pre-built app connectors, a visual workflow builder, and support for custom code pieces — combining accessibility with extensibility.
When it’s better: When you want Zapier-like ease of use with the option to self-host, extend with custom integrations, and avoid per-task pricing at scale.
Who should use it: Startups and technical teams looking for a cost-effective, extensible automation platform with the option to run on their own infrastructure.
Website: https://www.activepieces.com
Key Takeaways
- Zapier AI automation combines no-code app connectivity with intelligent AI processing steps — enabling workflows that not only move data but also understand and transform it.
- The most valuable Zaps are built around your most frequent, most reliable trigger events — new form submissions, new CRM entries, new support tickets.
- Adding an AI step (AI by Zapier) to any workflow takes under two minutes and can add significant value — personalized email drafts, inquiry summaries, or lead classifications — at no additional complexity cost.
- Test every Zap step with real data before activating. One test run catches 90% of issues before they affect real customers or team members.
- Start simple: a three-step Zap that saves two hours per week is more valuable than a ten-step Zap you spent three weeks building and never fully deployed.
- For most business teams, Zapier’s Starter plan at $19.99/month delivers a return on investment within the first week of use.
Conclusion
Zapier AI automation represents the most accessible entry point into business workflow automation available today. For the majority of repetitive, rule-based tasks that consume team time — moving data between tools, triggering notifications, routing leads, sending follow-ups — Zapier can handle them reliably, consistently, and without developer involvement.
The tutorial in this guide — a contact form submission triggering an AI-drafted email, a Google Sheets log entry, and an automated follow-up — is one of hundreds of workflows your team can build using the same logic. Once you understand how triggers and actions connect, the approach applies to every tool in your stack.
Start with one workflow. Pick the task your team repeats most often. Build it, test it, turn it on, and watch it run. The time it saves in the first week will tell you everything you need to know about what to automate next.
The best no code automation is the one that is actually running — not the perfect workflow you are still planning to build.